Some times we need desktop environment instead of ssh. So i record how to install xfcd and xrdp here. this document demo in the Debian 12. 1. update system apt update apt upgrade 2.install xfce desktop environment apt install xfce4 xfce4-goodies 3.install xrdp service apt install xrdp 4.check xrdp if installed successful systemctl status xrdp 5.add xrdp user into ssl-cert group adduser xrdp ssl-cert 6.restart xrdp systemctl restart xrdp 7.config firewall allow 3389 ufw allow 3389 8. connect vps use windows remote desktop connection mstc 9.please wait a moment when the mouse display , because sometime it is slowly. 10. install firefox apt update apt upgrade apt install snapd snap install core snap install firefox 11. restart vps 12.open firefox from the system menu.

one day ,when i login to my ubuntu vps. i found my vps server login two session one time by follow command. ss -tnp | grep sshd then ,i realize that my server has been hacked. so , i decide to do somthing to protect my server. the first thing is to configuremy server to use key-based ssh login instead of login with a username and password method. first, i generate the ssh key using the follow command. ssh-keygen -t ed25519 -C "joey@itech.sh" if you use the default settings to answer the previous question. two files will be generated in the following directory. ~/.ssh/id_ed25519 ← (private key) ~/.ssh/id_ed25519.pub ← (public key) and then ,what i need to do is upload he publick key to my server.so i use the following command to accomplish this. ssh-copy-id root@memos.ifish.blog in the above command , root@memos.ifish.blog is the vps server domain and username.after the command complete ,the public key will be uploaded in the vps's root directory once you finish the ablove steps. i can login my vps server now. but if i want to use putty to login to my server. i need to convert the private key to a format that putty can read . this process is simple.so i won't want explain here.
In linux you can capture the network package used by tcpdump sudo install tcpdmp,if you use debian .you can install it with apt install tcpdump 2. capture the newtork package used next command ,the network_interface_name can find by ip command. sudo tcpdump -i netwrok_interface_name -w capture_name.pcap 3. download the capture_name.pcap and opened it with wireshark.
Recently,i want to install ubuntu .So i find the latest version in the ubuntu website. The latest ubuntu version is 24.04. when i install the ubuntu desktop version. I want remote control it from my windows 11.In the latest ubuntu ,it's include remote control services. The next step is how to set up it used to be control by windows11. 1. open the settings,find the "system" and "Remote Desktop" on the right panel. 2.in the opened dialog.enable "Desktop Sharing" and "Remote Control" two options. then set "Username" and "Password" in the Login Details group. Attention password in this is not login ubuntu's password.you can click the eye to see it.and click the pen button to change it. 3.Do all the two steps.you can remote control it from your windows 11. Ubuntu 24.04 default input manage is ibus.after i install some chinese input method.i can not see it in the input sources yet.So i install the fcitx5 on the ubuntu. Next is how to install fcitx5 on the ubuntu 24.04. 1. sudo apt update 2. sudo apt install fcitx5 fcitx5-chinese-addons fcitx5-config-qt fcitx5-configtool fcitx5-chinese-addons includes Pinyin and Shuangpin support. 3. im-config -n fcitx5 Then log out and log back in. Open Fcitx 5 Configuration (fcitx5-configtool) from the application menu. Click "+" to add a new input method. Search for Pinyin (or your preferred Chinese method) and add it.
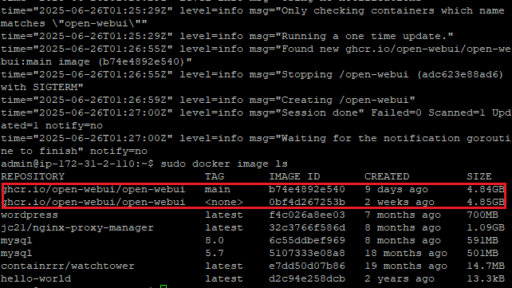
OpenWebUi update so quickly so have to write a post to record it. I deploy it with docker with default set. so this article is show the process in the openWebUI deploied by docker. ssh the server execute the command sudo docker run --rm --volume /var/run/docker.sock:/var/run/docker.sock containrrr/watchtower --run-once open-webui execute the command sudo docker image ls if you find the image list contain two open-webui .and one' tag is <none> then update success. if your server disk space is small like me .you can delete the docker image to save the disk space used the command sudo docker rmi <IMAGE ID>. please notice used the image id to prevent to delete the docker image that just updated image.

这是一个很奇怪的坑。 使用DockerHub中提供的DockerCompose文件安装MediaWiki。 初始化安装后一切顺利。在初始化的最后也生成了一个LocalSettings.php文件,也自动下载到了本地。 通过WinScp工具将这个文件上传到了DockerCompose.yml所在目录。 也修改了dockercompose文件,将其中的挂在LocalSettings.php的行的注释也取消掉了。 这时再去访问刚刚搭建的这个Wiki时,一直提示,LocalSettings.php找不到。一直卡在初始化安装界面。 我在主机上给LocalSettings.php文件为777的权限。但也无济于事。 最后,我想到干脆将这个文件COPY到容器的内部。没想到成功了。但是这样做按理说从起容器后,应该失效才是。所以我就重启了容器,但是它还是好的。我通过compose命令重启,也是好的。 奇怪了。 解决方案就是 进入容器内部,将主机上的这个文件Copy到容器内部。 其实还有一些验证手段,比如,将容器内部的这个文件修改一下内容,比如数据库连接参数,测试一下。它是用的容器内部还是主机上映射的。通过验证,发现并没有加载Host上的配置文件。 因为奇怪,所以记录一下。 ---------------------------------------找到问题并解决分割线-------------------------------------------------------- 找到问题了,使用DockerCompose重启Docker命令,是使用 sudo docker compose down sudo docker compse up -d 这种情况下才会去重新加载Dockercompose.yml文件中新的配置。 sudo docker compose stop sudo docker compsoe start 这种情况下是不会重新加载dockercopose.yml文件中的配置的。只是将当前的dockercompose.yml文件中的容器重启一下而已。 还是对docker compose不熟导致的问题。 😮💨。
如果别人电脑上已有镜像,可以直接从他的电脑上将镜像COPY到无法连接Docker HUB的电脑上来。 在已有镜像的电脑上,找到要COPY的镜像。比如nginx镜像 sudo docker save -o nginx.tar nginx:lastest 在要安装镜像的电脑上,执行导入。 sudo docker load -i nginx.tar 该命令会自己解析,不需要再做任何操作,即可将nginx镜像COPY到此电脑上了。
因为我在一个Host主机上部署了两个mysql container.不要问我为什么要部署两个。为什么不放在一个HOST中,建立两个数据库。 是因为两个应用的所需版本不一样。 那这个时候,后安装的那个就需要改一下端口。 改端口的方法如下: 创建一个文件my-custom.cnf文件,文件内容如下: [mysqld] port=3307 在这个文件中,将mysql的端口从3306改为3307. 2. 在docker-compose中将这个文件挂载到container中。并且其他container连接到mysql时,需要变更端口号,如下图。 3.确认一下,是否成功
Docker compose 使用上有些基础功能需要记录一下。以免将来使用的时候又要到处去找。 一. Dokcer-compose.yml文件。当开始使用这个文件的时候,会发现同时需要有多个这个文件构建Container的时候。不知道如何操作。后来发现其实还是蛮简单的。首先,你要构建的这个应用也就是container是做什么用途的。比如是博客系统wordpress。那么我们其实首先应该在合适的方先通过sudo mkdir -p wordpress.这个命令来建立这个目录。再在这个目录下新建 docker-compose.yml文件。再使用sudo docker compose up -d.命令使得container启动即可。同理再构建比如Memos的时候,也应该先建立这个目录。再在这个目录下新建 docker-compose.yml文件。再启动container即可。这里发现没有,在不同的目录下新建 docker-compose.yml文件,同时启动container即可。不能在同一个目录下。 二.docker-compose.yml这个文件中的网络配置,一般来说,好像不配置networks这个节点。Docker-compose会自己创建一个bridge类型的网络。但是如果我们想将新建的container加入到现存的network中。需要使用externa:true进行标记。并在每个container中加入到这个网络。如下图: 三.docker-compose.yml文件中有一个volumes的设置,初一看到这个文件会比较奇怪,为会在每个container.中有使用其挂载或说映射到了内部container的一个目录。可是在实际的host主机中却并没有说明这个映射到了主机的什么目录下。这是因为,docker-compse新版本具备的一个功能,它会自行创建一个目录。不需要用户先行创建这个目录。这个目录一般可以通过sudo dokcer inspect 对应的container.得到真实的映射在主机上的目录。